Organize the installation
Tip
The steps below are for the CAS servers - not the build server. That being said - if you are going to install and maintain via Ansible - you don't need to do this manually, though it is worth seeing how to do it manually.
To make it easier to upgrade (and if needed, downgrade) Tomcat without having to reapply configuration file changes, or reinstall web applications, it's better (in my opinion) to pull certain directories outside of Tomcat's own directory, them symlink them from the Tomcat directory to a more permanent place on the operating system.
You should still review release notes for upgrades, in case there are any configuration changes which could cause issues.
Move the configuration (conf) directory to /etc/tomcat
The conf directory has Tomcat's configuration files. If you're like me - you prefer to manage your configuration for applications from /etc. We'll be initially moving the conf directory to /etc/tomcat to give it a starting point, but then will create a symlink to point /opt/tomcat/latest/conf to /etc/tomcat
[root@login6devb ~]# cd /opt/tomcat/latest/
[root@login6devb latest]# cp -pR conf /etc/tomcat
[root@login6devb latest]# rm -rf conf
[root@login6devb latest]# ln -s /etc/tomcat conf
Move the logs directory to /var/log/tomcat
We'll be doing the same with the logs directory as with configuration. This way your log files persist across versions (and you don't have to go hunt down the version that was running when you need logs from day 'x'). You may also keep /var/log or /var as separate partitions to avoid log files filling up the root filesystem.
[root@login6devb ~]# cd /opt/tomcat/latest/
[root@login6devb latest]# cp -pR logs /var/log/tomcat
[root@login6devb latest]# rm -rf logs
[root@login6devb latest]# ln -s /var/log/tomcat logs
Move the webapps directory to /var/lib/tomcat
Same drill as the last two - best to keep the webapps directory in a more permanent location. This way you don't have to move /opt/tomcat/apache-tomcat-{versionx}/webapps/cas.war to /opt/tomcat/apache-tomcat-{versiony}/webapps/ after each upgrade of Tomcat.
[root@login6devb ~]# cd /opt/tomcat/latest/
[root@login6devb latest]# cp -pR webapps /var/lib/tomcat
[root@login6devb latest]# rm -rf webapps
[root@login6devb latest]# ln -s /var/lib/tomcat webapps
Move the work directory to /var/cache/tomcat/work
Tomcat’s work directory is where translated servlet source files and JSP/JSF classes are stored. Its contents are created automatically, but don’t need to be recreated unless the application has been changed. To reduce startup time, the contents of this directory should be preserved across application restarts and system reboots. Linux systems provide the /var/cache directory for just that purpose, so we can put the work directory there. To do this:
[root@login6devb ~]# cd /opt/tomcat/latest/
[root@login6devb latest]# mkdir /var/cache/tomcat
[root@login6devb latest]# cp -pR work /var/cache/tomcat/work
[root@login6devb latest]# rm -rf work
[root@login6devb latest]# ln -s /var/cache/tomcat/work work
Move the temp directory to /var/cache/tomcat/temp
Tomcat provides a temp directory for web applications to store temporary files in. But like log files, temporary files can sometimes be very large, so storing them in /opt is probably not a good practice. But /tmp and /var/tmp are not the best places either, because we want to be able to limit access to Tomcat’s temporary files (see Harden the installation). Therefore, we will create a new temp directory under /var/cache/tomcat. To do this:
[root@login6devb ~]# cd /opt/tomcat/latest/
[root@login6devb latest]# cp -pR temp /var/cache/tomcat/temp
[root@login6devb latest]# rm -rf temp
[root@login6devb latest]# ln -s /var/cache/tomcat/temp temp
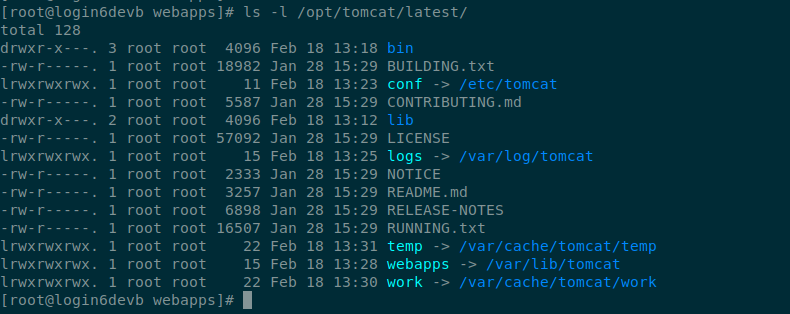
Final layout
Your layout should look like the following:
